Interview | Note-1
网络基础知识
OSI开放式模型(七层协议、参考的国际模型)
先自上而下,后自下而上的处理数据的头部
物理层:解决物理介质的传输、原始比特流传输、模数转换、数模转换、网卡工作层
数据链路层:物理寻址、将比特流转变为逻辑传输线路、错误检测、确保数据传输的可靠性、交换机工作层
- 网络层:将网络地址翻译成对应的物理地址、并且决定数据从发送方路由到接收方、保证数据发送优先权、网络阻塞程度、路由器、数据包、TCP/IP协议、分组传输
- 传输层:必要时对数据进行分割,并且交由网络层,保证数据段有效到达对端、1500字节、TCP/UDP协议
- 会话层:自动收发包、自动寻址、建立及管理会话、解决不同系统的语法
- 应用层:固定消息头、消息体、信息的语法语义及其关联、HTTP协议
TCP/IP(四层模型、OSI的实现)
先自上而下,后自下而上的处理数据的头部
| OSI七层 | TCP/IP四层 | 功能 | TCP/IP协议族 |
|---|---|---|---|
| 应用层 | 应用层 | 文件传输、EMAIL、文件、虚拟终端 | HTTP/FTP/SMTP/DNS/Telnet |
| 表示层 | \ | 数据格式化、代码转换、数据加密 | \ |
| 会话层 | \ | 建立以及管理会话 | \ |
| 传输层 | 传输层 | 提供端对端的接口 | TCP/UDP |
| 网络层 | 网络层 | 为数据包选择路由 | IP/ICMP/IGMP/RIP |
| 数据链路层 | 链路层 | 传输有地址的帧、错误检测 | PPP/MTU |
| 物理层 | \ | 二进制形式在物理媒体传输 | ISO02110/IEEE802/IEEE802.2 |
TCP/IP重点在于,实际应用中应该开发的应用和协议
参考链接:https://blog.csdn.net/qq_38950316/article/details/81087809
TCP三次握手
TCP 传输控制协议
- 面向连接的、可靠的、基于字节流的传输层通信协议
- 将应用层的数据分割成适当长度的报文段(MTU)并且发送给目标节点的TCP层
- 数据包有序号Sequence Number,对象收到则发送ACK确认,未收到则重传
- 使用奇偶校验和检验数据在传输过程中是否有误

- URG:紧急指针 1-有效 0-忽略
- ACK:确认序号 1-有效 0-不包含确认信息
- 确认号:其数值等于发送方的发送序号 +1(即接收方期望接收的下一个序列号)
- PSH:push标志 尽快提交到应用层,而不是在缓存中
- RST:重置连接 重置崩溃
- SYN:同步序号,用于建立连接过程
- FIN:finish,用于释放连接
三次握手流程
- 第一次握手:建立连接时,客户端发送SYN包(SYN=J)到服务器,并且进入SYN_SEND状态,等待服务器Query
- 第二次握手:服务器收到SYN包,必须确认客户的SYN(ACK=J+1),同时自己也发送一个SYN包(SYN=K),即SYN+ACK包,此时服务器进入SYN_RECV状态
- 第三次握手:客户端收到服务器的SYN+ACK包,向服务器发送确认ACK(ACK=K+1),此包发送完毕,客户端和服务器进入ESTABLISHED状态,完成
为什么需要三次握手
- 为了初始化Sequence Number的初始值,作为往后的通讯序号
首次握手的隐患——SYN超时
- Server收到Client的SYN,回复SYN+ACK的时候,Server未收到ACK确认
- Server不断重试至超时(Linux默认等待63秒断开)
- 可能导致服务器遭受SYN Flood的风险
- 针对SYN Flood的防护措施
- SYN队列满后,通过tcp_syncookies参数回发SYN Cookie
- 若为正常连接,则Client会回发SYN Cookie,直接建立连接
- 针对SYN Flood的防护措施
建立连接后,Client出现故障
- 保活机制
- 向对方发送保活检测报文,如果未收到响应则继续发送
- 尝试次数达到保活检测数仍未收到响应则中断连接
TCP四次挥手
用于TCP连接是全双工,每个方向都必须单独进行关闭,发送方和接收方都需要FIN报文和ACK报文,首先进行关闭的一方主动关闭,另一方则被动关闭。
任何一方执行close()操作即可产生挥手(经过时间2MSL才真正释放)

为什么有TIME_WAIT
- 确保有足够时间让对端收到ACK包
- 避免新旧连接混淆
服务器出现大量CLOSE_WAIT状态
CLOSE_WAIT:被动关闭的一端收到FIN后,但未发出ACK的TCP状态
- 对方关闭socket连接,我方忙于读或写,没有及时关闭连接
- 检查代码:被动关闭一端的代码,尤其是释放资源的
- 检查配置:处理请求的线程配置
TCP & UDP区别
UDP特点
- 面向非连接
- 不维护连接状态,支持同时向多个客户端传输相同的消息
- 数据包报头只有8个字节,额外开销较小
- 吞吐量只受限于数据生成速率、传输速率以及机器性能
- 尽最大努力交付,不保证可靠交付,不需要维持复杂的链接状态表
- 面向报文,不对应用程序提交的报文信息进行拆分或合并
区别
- 面向连接 & 无连接
- 可靠性(TCP)
- 有序性(TCP-序列号,到达无序)
- 速度(UDP更快)
- 量级(TCP-重量级、UDP-轻量级)
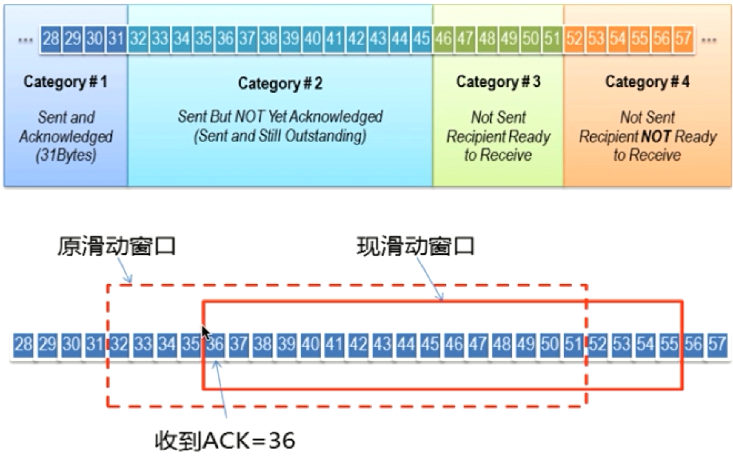
TCP滑动窗口
RTT:发送一个数据包到收到对应ACK所花费的时间
RTO:重传时间间隔
TCP使用滑动窗口做流量控制与乱序重排
- 保证TCP可靠性和流控特性
AdvertisedWindow = MaxRcvBuffer - (LastByteRcvd - LastByteRead)
EffectiveWindow = AdvertisedWindow - (LastByteSent - LastByteAcked)
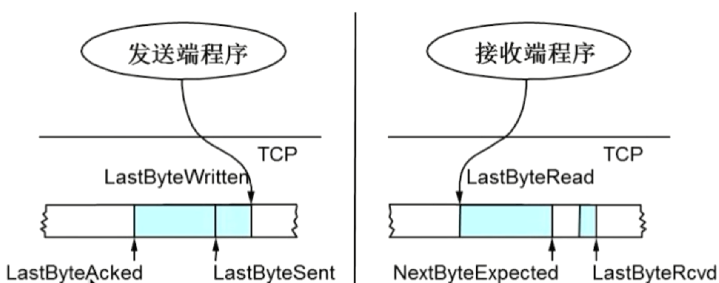
TCP会话的发送方
TCP会话的接收方

HTTP
HTTP特点
- 支持C(Client)/S(Server)模式
- 简单快速
- 灵活(任意类型数据对象)
- 无连接(限制每次只处理一个请求)
- 无状态(处理事务没有记忆)
HTTP请求结构

HTTP响应结构

请求/响应的步骤
- 客户端连接到Web服务器
- 发送HTTP请求
- 服务器接受请求并且返回HTTP响应
- 释放TCP连接
- 客户端解析HTML内容
在浏览器输入URL,键入回车的流程
- DNS解析
- 根据IP地址和Port建立TCP连接
- 发送HTTP请求
- 服务器处理请求并且返回HTTP报文
- 浏览器解析HTML
- 连接接受
HTTP常见状态码
- 1xx 指示信息 - 请求已接收,继续处理
- 2xx 成功 - 请求已被成功接收、理解、接受
- 3xx 重定向 - 要完成请求必须进行更进一步的操作
- 4xx 客户端错误 - 请求有语法错误或请求无法实现
- 5xx 服务端错误 - 服务器未能实现合法的请求
GET / POST
区别
- HTTP报文:GET将请求信息放在URL,POST放在报文体中
- 数据库:GET符合幂等性和安全性,POST不符合(每次请求都不同)
- GET可以被缓存,POST不行
Cookie / Session
Cookie
- Cookie由服务器发给客户端的特殊信息,以文本的形式存放在客户端
- 客户端再次请求时,会把Cookie回发
- 服务器接收到Cookie,会解析与客户端相对应的内容
Session
- 服务器端的机制,在服务器上保存的信息
- 解析客户端请求并操作session id,按需保存状态信息
- 实现方式
- Cookie - JSESSIONID = xxx
- URL回写
区别
- Cookie数据存放在客户端的浏览器,Session数据存放在服务器
- Session相对于Cookie更安全
- 考虑减少服务器负担,应使用Cookie
HTTP / HTTPS

SSL(Security Sockets Layer)
- 为网络通信提供安全及数据完整性的一种安全协议
- 操作系统对外的API(SSL3.0更名TLS)
- 采用身份验证和数据加密,保证网络通信的安全和数据的完整性
加密的方式
- 对称加密、非对称加密、哈希算法(算法不可逆-MD5)、数字签名
HTTPS数据传输流程
- 浏览器将支持的加密算法信息发送给服务器
- 服务器选择支持的加密算法,以证书的形式回发浏览器
- 浏览器校验证书合法性,并且结合证书公钥加密信息发送给服务器
- 服务器使用私钥解密信息,验证哈希,加密响应消息回发浏览器
- 浏览器解密响应消息,并对消息进行验真,进行加密交互数据
区别
- HTTPS需要CA申请证书
- HTTPS密文传输,HTTP明文传输
- 连接方式不同,HTTPS默认443,HTTP默认80
- HTTPS = HTTP + 加密 + 认证 + 完整性保护
Socket
- Socket是对TCP/IP协议的抽象,是操作系统对外开放的接口
- IP + PID
Socket通信流程

面试题
- 客户端向服务器发送一个字符串,服务器收到该字符串后将其打印到命令行上,然后向客户端返回该字符串的长度,最后,客户端输出服务器端返回的该字符串的长度,分别用TCP和UDP实现
1 | public class LengthCalculator extends Thread { |
TCP
1 | public class TCPServer { |
1 | public class TCPClient { |
UDP
1 | public class UDPServer { |
1 | public class UDPClient { |